I "
met"
Doug through this blog and was completely blown away with his landscape images and wanted to share him (
and his images) with you.
So, without further delay,
Doug Chinnery:
"I live on the edge of Sherwood Forest in Nottinghamshire, England – home of Robin Hood! In fact many of my images of trees are taken in the forest.
I have always taken photographs but got serious with the advent of digital photography, starting out with Canons 350D. I soon upgraded to the Canon 5d and then on to the 1ds mk2. I work with full frame cameras as my first love is landscapes.
I now am now more or less a professional photographer, selling prints of my images and shoot stock for Alamy and Getty. I shoot portraits, weddings (the most stressful thing I do!), commercial customers and now conduct my own workshops. I am also working on my first photography book.
I enjoy shooting landscapes but hold back from describing myself as a ‘Landscape photographer’, I prefer to think of myself as just a ‘photographer’.
Why photography? I just love being out and being creative. I enjoy very early mornings and being in the landscape alone or with good friends. I enjoy the experiences only early risers get of seeing our world at its very best. I also enjoy teaching and sharing knowledge, hence my workshops and my blog. I believe in freely spreading knowledge of locations and techniques. I find it hard to understand photographers who jealously protect their knowledge and seem to see other photographers as a threat.
The photographers I admire are David Noton, Joe Cornish and Charlie Waite. The standards they set give me something to work towards and aspire to."His equipment:
"Canon 1ds mk2br>Canon L lenses - 16-35, 24-70, 70-200.
Plus the 100mm L Macro, f1.4 50mm and the 1.4x extender (I also use a Lensbaby Composer)
Lee ND Grad Filter system
Giottos Carbon Fibre Tripod with Manfrotto 405 Geared Head
I always use mirror lock, a hot-shoe level and a remote release.
I always shoot in RAW and process the images in Lightroom followed by dust spotting, levels and curves adjustments in Photoshop. I try to get the images right in camera so I have to do as little as possible on the computer. The exception to this is where I create artistic images using textures. For my black and white images I use Silver Efex Pro. The tip that has made the biggest improvement to my images has been to spend some time understanding the Histogram and ‘shooting to the right’. Most of the information in a RAW file is in the highlights end of the histogram – underexposing certainly makes the image more colorful and contrasty on the camera and computer screen, but you're missing so much data. Overcome being put off by seeing washed out flat images on the camera and trust the histogram. When you get back to the computer you can bring all that richness back with levels and curves and will end up with a much better image than if you had underexposed."His images:
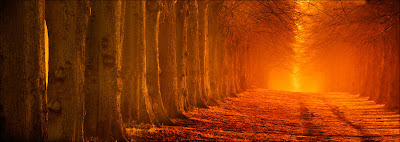.jpg) "Walking in Golden Dreams"
"Walking in Golden Dreams"
I was in a bit of a dream when I shot this image. It was taken in Clumber Park, part of Sherwood Forest, and I visited the location probably 20 or 30 times before I got these conditions. It was a February dawn, a slight mist floated between the trees and as the low rising sun hit the mist it burst into liquid gold. I had just a couple of minutes of feverish activity to capture the scene. That year, the images I took became my best sellers by far. Settings – ISO 50, 280mm, f22, 0.8 seconds.
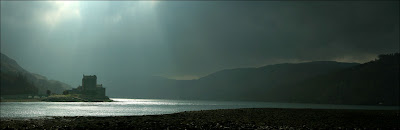.jpg) "Eilean Donan Castle"
"Eilean Donan Castle"This is probably the most photographed castle in Scotland, it is on a loch as you approach the bridge over to the Isle of Skye. My wife and I were on our return journey home after a weeks holiday on Skye. As we rounded the loch I could see the light was amazing. I was new to digital photography then but had the foresight to shoot seven images with my Canon 350D which I later stitched into this panorama. The light lasted five minutes before a storm hit and dissolved into rain. Settings - ISO100, 46mm, f10, 1/160.
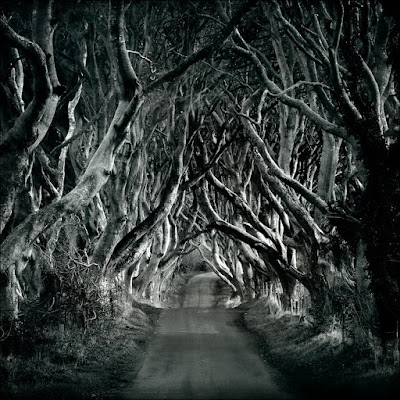.jpg) "When the way seems difficult"
"When the way seems difficult"This is a lane in Northern Ireland near the village of Armoy. It is called locally, ‘the dark hedges’. I used a 70-200mm IS L zoom lens with the 1.4x extender for this image to compress the perspective and enhance the nature of the trees. Settings - ISO 50 at f16 for 61 seconds as the light was fading. I converted the image to B&W to focus the eye on the shapes and contrasts rather than being distracted by the colors. The square crop was used to enhance the symmetry of the image.
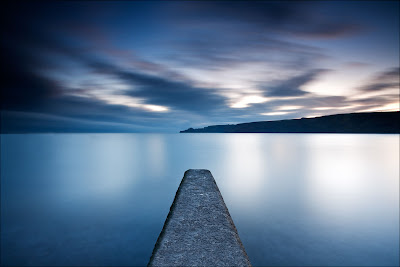.jpg) "Runswick Bay"
"Runswick Bay"
This image was shot in the North Yorkshire coast this winter, before sunrise. I used the jetty as a lead in and centralized it to give a symmetrical image with a strong feel. I put on 5 stops of Lee ND filter and a 3 stop soft ND grad to balance the exposure. Settings - ISO 50, f18, 16mm for 83 seconds. This flattened the sea to a translucent sheet and captured the movement in the clouds. In this type of situation I often look for symmetry as this seems to work well with fine art images.
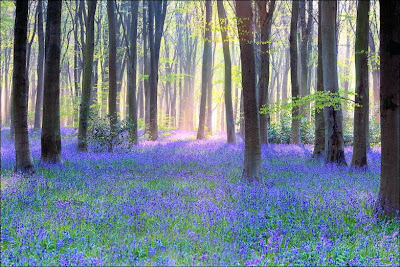.jpg) "Bluebell Wood"
"Bluebell Wood"
This image took a lot of energy and willpower to get. It meant a 1am rise to drive for four hours to be in place for dawn. On the drive it poured with rain and I feared the drive was wasted. However just before dawn the rain stopped and mist started to rise. The bluebells were soaked in rain water – I got drenched to the waist moving through the wood. I used a long lens to compress the effect of the bluebells and a ND filter to hold back the dawn light pouring through the mist as it evaporated. After an hours shooting I was shattered, wet, cold and still had a long drive home, but the images were well worth it. In fact this image became my best sellers last year. Settings – ISO 50, 98mm, f11, 1/6 second.
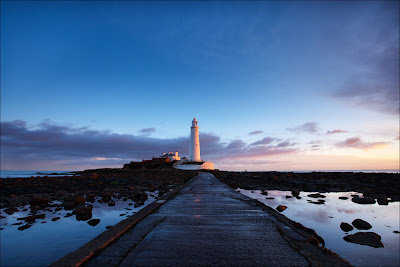.jpg) "St. Mary's Lighthouse"
"St. Mary's Lighthouse"This was such a beautiful dawn, soft, gentle warm light bathed the lighthouse, again I used the causeway, which is covered at high tide, to create a symmetrical composition. Settings – ISO 50, 16mm, f16, 0.8 second – Lee ND grad filter.
(click on any of these stunning images to view larger, in a new window)


 You can get these textures (and many more) for free over at CGTextures and you can walk through the step by step tutorial here.


.jpg)
.jpg)
.jpg)
.jpg)
.jpg)
.jpg)