Friday, February 11, 2011

You can't have too much memory...

If you are in the market for memory I have a couple of sweet Valentines Day deals for you from Adorama, great prices, customer service to match their prices, and shipping is free.


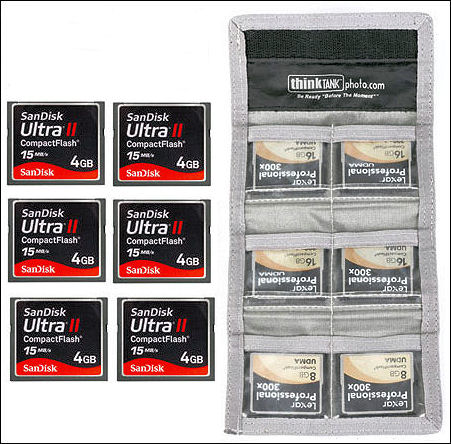
The first deal is for a 6 pack of 4GB SanDisk Ultra II Compact Flash memory cards and it includes a Think Tank card case to hold them and you get it all for only $74.95. That's almost half off the regular price (46% to be exact).

I've used SanDisk for quite some time and have been very happy with their performance, there are times when I shoot fast (machine gunning it) and have never had to wait while images are written to the card.


Deal number two is for a Lexar 16GB 100x Platinum II Secure Digital High Capacity (SDHC) Memory Card for just $29.95 (again, with free shipping). If you purchase two Adorama will take an additional dollar off each card.


Thursday, February 10, 2011

That Gritty Dave Hill Look...

In the 4 plus years we have been writing this blog our post regarding the "faux" Dave Hill look is by far one of our most popular posts, so here it is again.


If you have not seen the work of Dave Hill you need to, please take a minute (or 10) and look at his incredible images.

Now to imply that the technique I am about to show you is "just like Dave Hill's" would be a like saying my child worn minivan is just like a Ferrari. The only similarities is that they both have license plates, after that all similarities come to an end.

Though the ladies do love my minivan, as it is the "sport" version.

;)

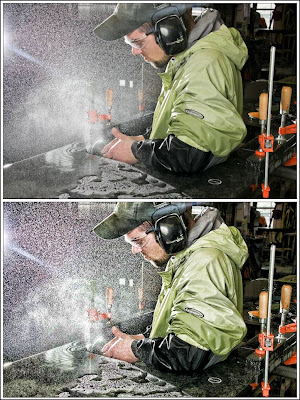
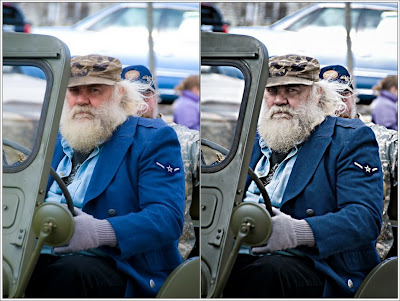
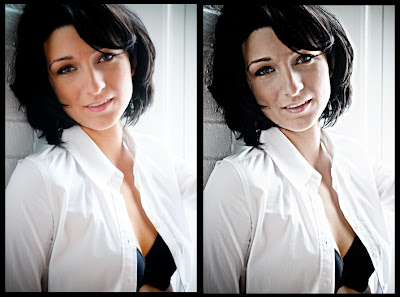
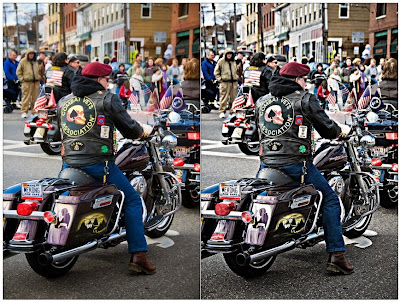
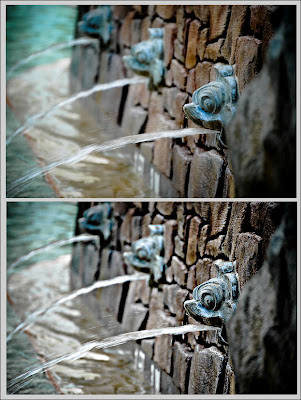
Anyway, the technique I am going to show you will give your images a cool gritty look and works on most images, but it does work best on high key images. Below are several of my examples.

And though it looks like a lot of steps, after you have done it a couple times it will take you only about a minute to complete (really).

So here goes:

Step 1:
Open your image in Photoshop and create a duplicate the layer.
Go to "Filter" - "Other" - "High Pass" set the Radius to 4 Pixels.
On the Layers palette select the "Vivid Light" blending mode.
Flatten the image.

Step 2:
Create a duplicate the layer (again).
Go to "Filter" - "Other" - "High Pass" set the Radius to 7 Pixels.
On the Layers palette select the "Color" blending mode with an opacity of 40%.
Flatten the image.

Step 3:
Create a duplicate the layer (one last time).
Go to "Filter" - "Blur" - "Gaussian" set the Radius to 9.5 Pixels.
Go to "Filter" - "Noise" - "Add Noise" set Amount to 3%.
Got to "Layer" - "Layer Mask" - "Hide All"
Now use the lasso tool and select only the eyes (assuming the image has eyes, for multiple selections hold the shift key).
Go to "Select" - "Refine Edges" - set "Feather" to 5-6 pixels, then "Select" - "Inverse"
Select the brush on your tool palette, set the brush opacity to 30% and brush over the entire image once.
Flatten the image.

Step 4:
Go to "Filter" - "Sharpen" - "Unsharp Mask" and use the following settings:
Amount 100%
Radius 30.0 pixels
Threshold 0 Levels

That's it, give it a try, and I would love to see your results.

If you click on any of the images below they will open larger and in a new window so you can have a better view of how the effect has changed each image.

Tuesday, February 8, 2011

41 fun & educational Photoshop effects...

This is a link I came across sometime back and wanted to share with you folks, it's "41 Nicest Photoshop Photo Effects - Photoshop Tutorials".

I am not going to bore you with listing them all (because you really should go take a look), but I have done a handful of these tutorials and will share the results of two that I have done below.

Before you say things like "I don't want to give my client a tattoo", "surrealism is not part of my business model", or "Scott, you really are the smartest guy I know" (well okay, no one will say that), but before you say the first two realize that doing these kind of tutorials will have you using layers, brushes, and techniques in new (or different) ways that just might make you a better user of Photoshop.

And what starts out as a good learning tool could very well turn into a fun little project for a friend or family member.

Here are my two examples, the first is the "crack and peel skin". For this one you will need a background images, I used rust and dried mud, both of which I got (for free) at CG Textures.


The second is the "tribal tattoo" and I don't remember where I got the tattoo, sorry.


To get a better look simply click on any of the images to view larger and in a new window.

Friday, February 4, 2011

Raddish


Photographer:Kapil Raichana

Westcott Apollo Softbox Review...


Here is our video review of the Westcott Apollo softbox.

Included here are a couple photos showing the wooden dowel extender we added for two reasons:

1. To give the center shaft additional stiffness/rigidity so that when we tighten down the thumb screw (on the flash bracket) it does not dent/collapse the shaft, and


2. When closing the softbox the center ring pulls beyond the shaft, so the next time you use the softbox there is a bit of fumbling (and mumbling) as you try and line up the shaft and center ring


The dowel cost (well) under a dollar and keeps the shaft from getting beat up during use and makes setup just that much easier. We did not glue it in so that if (for what ever reason) it needed to be removed at some point in the future.

Don't misunderstand me, the dowel does not take this from a good softbox to a great one, the Westcott Apollo softbox is outstanding... period.

It simply makes life a little bit easier.

Though they are not on sale right now (current price is $114 with free shipping), Adorama will often have them on sale for $95 with free shipping, so keep an eye on their site.

Below is our video review, subscribers will need to return to the blog or head directly over to our YouTube channel to watch it.


Thursday, February 3, 2011

Strobist Photo Trade Secrets...


Strobist Photo Trade Secrets, Volume 2: Portrait Lighting Techniques has been released.

Similar to Volume 1 (see our review here), you get a lot of great lighting tips, but this set is focused on shooting portraits and are even more affordable (only $17.99).

You will find 25 different portrait lighting scenarios (microlessons) and the vast majority are shot using only SpeedLights, and many using just one light.

Great lessons, a wonderful resource, so please head over to Peachpit and check it out for yourself.

FYI: the spiral binding you see in the images below are my own "hack" that you can learn more about in our other review.


Wednesday, February 2, 2011

Winter in America...

We got 8 inches of snow yesterday and here is our forecast for today... another 12-18 inches... maybe more, they're "not sure".


Of course I am not telling many of you anything new as the storms we have been experiencing have already kicked the stuffing out of many of your communities on their way here.

Here are some image I received yesterday.

Feel free to post some of your winter images on the Weekly Photo Tips Flickr group, I would love to see them.