Saturday, August 22, 2009

MpixPro review...

I don't make a habit of posting on the weekend (or posting consecutive product reviews) but I received a package yesterday afternoon and I really did not want to wait to share the contents.

This past Monday I joined MpixPro and though short, it has been pretty darn impressive ride so far.

As photographers I don't think we can have too many good resources and many photographers that have my respect are members of MpixPro already so I thought I would give them a try.

I submitted my application for membership on Monday morning and was approved later that same day. Once approved you upload 5 test images that MpixPro will print as 8x10's and ship out for next day delivery, all for free. I uploaded my images Wednesday, received an email Thursday letting me know that the printing was completed and that my package was being shipped that day, arriving on my porch Friday.

The purpose of the five uploaded images is for monitor calibration testing, to make sure what they print matches what you see on your monitor (as they do not offer color correction so the quality of the print is directly dependant on your monitor being properly calibrated).

To make sure I got a good sampling of their printing abilities I sent black & white images, color images, action, and still life.

Every print they sent me was outstanding.

Along with my five 8x10 images my package included a catalog of all the product MpixPro offers as well as a sample of all the papers they print on.

I did not become an MpixPro member so I could review them on Weekly Photo Tips, but my experience has started out so well and the quality of the prints they sent so good, I really wanted to share it with other photographers.

Membership is free, so you have nothing to lose and outstanding quality to gain.

You can see an introduction to MpixPro here, and over 20 videos on how MpixPro works and the products they offer here.

Friday, August 21, 2009

California Sunbounce Pro review...


If you shoot with reflectors please stop what you're doing, pull up a chair, and let me show you something way cool.

If you have ever shoot with a reflector outside in even the slightest of breezes you know just how difficult it is to put light on your subject because of the reflector bending and twisting in the wind.

And the larger the reflector the more bending, twisting, and difficult it becomes.

I recently got a California Sunbounce Pro and started being impressed as soon as I opened the box. When I unpacked (and assembled) my Sunbounce I was immediately taken with the quality of the materials and the design.

The frame is made of high strength aluminum tubing and can easily and quickly be put put together and taken apart, when disassembled it fits nicely into a small tripod size carrying bag for easy portability.

The day my package arrived it was (luckily enough) a breezy day and of course I had to assemble it and head right out doors, it was like I was pointing a flashlight (not fighting a kite in the wind) as I was easily able to put my light on a subject and just as important, keep it there. I was also impressed with the amount of light I could throw (which included throwing enough light inside the house to light up a subject standing 10 feet away from the window).

Two weeks ago I was shooting a wedding with Chris Riley in (Beautiful) Jackson New Hampshire and one place brides want their picture taken is in the old covered bridge (known as "Honeymoon Bridge").

The problem is that inside the bridge is dark, the further into the bridge you go, the darker it is.

As Chris and I were discussing how to address the (lack of ) lighting (we were considering setting up a couple speedlights) I remembered I brought my California Sunbounce and suggested we give it a try.

As you can see by the sample images, our subjects were standing pretty deep inside the bridge yet the Sunbounce had no problem throwing light on them.

In each set of images the exposure for the before and after image was exactly the same, the only difference is the light being thrown on them by my Sunbounce.

My Sunbounce Pro is all that AND a bag a chips, and once I finish this post will be ordering a Sunbounce Mini.

You can view each image larger and in a new window by clicking on it.


Wednesday, August 19, 2009

VIVA'S BOOK CLUB - WEDDING ETIQUETTE

Today's weddings are more complicated than ever, with new traditions replacing old, and new relationships to consider as family life grows more complex.

In this new edition, Peggy provides sensible solutions to wedding questions old and new, showing how to manage the big decisions and the little details with tact, consideration and confidence – leaving you free to enjoy all of the happy times along the way!

WEDDING THANK YOU'S

There is nothing more appreciated than a lovely handwritten thank you note. Some tips from Emily Post on turning this obligation into a pleasure not a chore.

When should notes be written?

Contrary to popular myth, the happy couple does not have a year’s grace period. All thank you notes should be written within three months of the receipt of the gift. Ideally, a response should be written on the day you receive a wedding gift. If that’s not possible, set a daily goal. It’s a lot easier to write three or four notes a day than to have to write a hundred notes in a month after the wedding!

What stationery should be used?

First of all, stationery is the operative word here: No fill-in-the-blank cards, no pre-printed cards, no phone calls, no emails and no generic post on your website!

Who needs a note?

- Anyone who gives you an engagement, shower or wedding gift, even if you have thanked them in person. Individual notes should be written to people who contributed to a group gift.
- Anyone who gives a gift of money: cash, checks, contributions to savings accounts and donations to charities. Mentioning the amount is optional, but it does let the person know the correct amount was received. You should mention what you plan to do with the money.
- Your attendants. A warm personal note attached to your gifts to your attendants will let them know how much you appreciate their efforts and support on your behalf.
- Anyone who hosted a party or shower for you. Ideally these notes should be written within two days of the event. Each host or hostess should be thanked individually with a note and a thank you gift.
- People who house or entertain your wedding guests. A note and a small gift should be sent to anyone who houses or entertains out-of-town wedding guests.
- People who do kindnesses for you. The neighbor who accepts delivery of your gifts when you are at work; the cousin who supervises the parking at the reception – anyone who assists you before, during or after your wedding.
- Suppliers and vendors. You don’t have to write everyone you hire for services, but anyone who exceeds your expectations will appreciate a courteous note of thanks.
- Your parents or whoever is hosting your wedding.

Ten Do’s and Don'ts of Thank You Notes

1. Do personalize your notes and make reference to the person as well as the gift.
2. Do remember that a gift should be acknowledged with the same courtesy and generous spirit in which it was given.
3. Do be enthusiastic, but don’t gush. Avoid saying a gift is the most beautiful thing you have ever seen unless you really mean it.
4. Don’t send form letters or cards with printed messages and just your signature; don’t use email or post a generic thank you on your wedding web site in lieu of a personal note.
5. Do promptly acknowledge the receipt of shipped gifts by sending a note right away or calling and following up with a written note in a day or two.
6. Don’t mention that you plan to return a gift or that you are dissatisfied in any way.
7. Don’t tailor your note to the perceived value of the gift; no one should receive a perfunctory note.
8. Do refer to the way you will use a gift of money. Mentioning the amount is optional.
9. Don’t include wedding photos or use photo cards if it will delay sending the note.
10. Don’t use being late as an excuse not to write. Even if you are still sending notes after your first anniversary, keep writing!

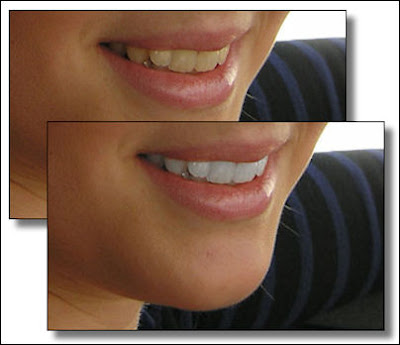
Teeth whitening with Photoshop CS4...

I recently came across a new site (to me) called TutorialBoard.net which is dedicated to "high quality tutorials for graphics design, motion graphics and visual effects artists" and they are true to their word. Great content, great tutorials.

One tutorial that we as photographers will find useful is "Whiten teeth to improve a smile in Photoshop CS4".

It is not uncommon for teeth (and eyes) to appear darker in an image than they actually are in real life and if we want to give our clients the best possible product we need to correct this problem, this tutorial makes the task quick and easy.

But sadly for those with older versions of Photoshop, this tutorial is specific to Photoshop CS4.

Tuesday, August 18, 2009

Live webinar with David Ziser...

Tomorrow night (Wednesday 8/18) David Ziser will be presenting "Let My Light Shine On".

David will be discussing how to light outdoor wedding photography, but the presentation is really applicable to any outdoor photography (not just weddings).

The major points of the webinar will cover:

1. Lighting Using Off-Camera Flash
2. Exposure Made Easy
3. Adding Dramatic Lighting Effects
4. Changing Up The Background
5. Making Your Subjects Look Beautiful

He had me at number one, because the best thing you can do for your images is getting the flash off your camera.

And not only will you get the webinar, you will also get to download the entire presentation for future reference and re-listening.

The day after the webinar you can purchase the download for "Let My Light Shine On" but it will cost you $39, so even if you can't attend Wednesday night you can signup, download it the next day and save yourself $10!

In this economy photographers need to "be smart" with our educational dollars and this is a low cost high return opportunity.

Hope to "see" you there.

Monday, August 17, 2009

An interview with Lou Jones...


Last week I reviewed the latest book from Lou Jones "Speedlights & Speedlites" and today Ibarionex Perello of The Candid Frame posted a recent interview he did with Lou.

It's enjoyable to learn more about a person who's work you like and if you are a Lou Jones fan this is a great chance to learn more about the man behind the camera.

I have mentioned The Candid Frame in previous posts, you can listen to in-depth conversations (45-60 minutes) with iconic photographers twice a month and you should really add The Candid Frame to your podcast list.

The interesting story behind the image with the guitars is that neither of them could play.

;)

And the architectural image was taken at the State house in Boston, if you are ever in the area it is a fun place to shoot, it has a ton of cool architectural details including stained glass, marble columns & stairs, paintings, and much more that could keep you shooting for some time.